Sensible Plumbing
Common sense is the best guarantee of a well-performing, safe plumbing system.
“We have very low pressure at the master bathroom shower, and if any other plumbing is used, we literally have no water coming out of the showerhead.”
The frustration in my new customer’s voice was palpable, and during the drive to his country estate, thoughts about the root causes of his home’s water-pressure woes ran through my head. I pulled into the driveway of what had to be a multimillion-dollar home. How could a house that looked this great be suffering so much internally?
I saw the problem almost as soon as I descended the stairs to the basement: A single pair of 1/2-inch PEX lines — one hot and one cold — running 75 feet along the ceiling, with T-fittings spliced in at intervals to serve fixtures on the three floors above. The master bath’s lines were last along this undersized flow-through system and, as you might guess, the master bath was on the third floor.
What were they thinking?
Simply put, they weren’t. Good plumbing isn’t rocket science; it’s applied science. Boil it down and you’ve got about 15% knowledge and 85% common sense. The problem is that most rough plumbing jobs are won or lost by a bid process that emphasizes cost-cutting over performance. But doing things right and controlling costs are not mutually exclusive. Both need to be engaged in designing and installing a plumbing system that makes sense. At its most basic, plumbing is simply the practical application of hydraulics and physics to bring clean, healthy water from a municipal water main or a well to the places in the house where it’s needed — and when we’re finished with it, to remove the waste via the sanitary sewer system to the municipal sewer or septic tank. Doing this sensibly does that while taking the long view by promoting the conservation of water and energy, ensuring delivery of water at safe temperatures, planning for future maintenance and, most importantly, guaranteeing satisfactory performance from day one. This article outlines the simplest, most sensible ways to ensure that happens.

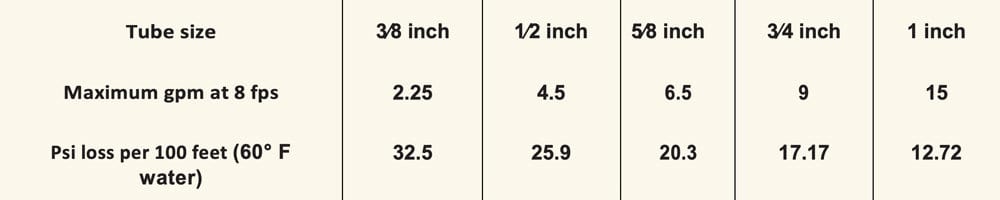
It all starts with enough water
The first step in designing any well-performing plumbing system is calculating how much water will be required for the PDL (peak-demand load). The term is more often associated with energy demands, but I use it to describe the amount of water required to meet the needs of the primary fixtures should they be used simultaneously. Once that’s determined, I usually use a percentage — 60% — as PDLs vary widely but can easily be determined by checking the manufacturers’ specification sheets for the fixtures to be installed in the house. At the very least, generalizations can be drawn based on federal regulations, which limit showerheads to 2.5 gpm at 80 psi, lavatory faucets to 1 gpm, kitchen sinks to 2.2 gpm, and toilets to 1.6 gpf. Water-saving fixtures, such as those under the EPA’s WaterSense designation, use less.
Generalizations can get you into trouble, however, as I found recently when some homeowners called me to find out why the European rain showerhead they had installed was barely drizzling lukewarm water down on them. Never mind that the thing was mounted 10 feet in the air in a shower big enough for a football team—it had a listed flow rate of 2.5 gpm and was being fed by a 90-foot long run of 3/8-inch pipe.
The big culprits that throw PDL calculations off are showerheads and whirlpool-tub fillers; they deserve full attention in terms of number, position and flow rates. Ask the homeowner, if there is one, what his or her family’s bathing habits are, and consider that in your calculations. If it’s a spec house and a second-floor bath has a walk-in dual shower, that’s a red flag where flow and adequate hot water are concerned. Above all else, pay attention to the master bath, because if the head of the house isn’t getting enough water, someone’s going to hear about it. If you don’t have the time or information available to tally up every fixture’s flow rate, there’s information on PDL in Appendix E of the International Plumbing Code.

ENLARGE
Table 1
Get the water there — fast and hot
I was working on a 12,000-square-foot house, and it’s not unusual in a house like that to see a 3/8-inch water line running 150 feet from manifold to faucet. I’m sure the guy who installed it was thinking, “Hey, it works at 50 feet, so I guess it’ll work at 150 feet.”
Getting the sizing and layout of supply lines right isn’t terribly complicated, but these days, there’s more than one way to deliver water: A flow-through trunk-and-branch system; a home-run system with each fixture having its own water line run to a central manifold; or a hybrid of the two. This is where your diligent PDL homework should pay off. If the home’s water is to be distributed by a flow-through system, each group of bathroom fixtures will be served by a pair of hot/cold water lines that need to meet that branch group’s PDL. A homerun system’s individual-fixture water line(s) must meet the PDL for that fixture. A hybrid system can provide lower material and labor costs than those of a home-run system by combining fixtures into groups where a drop-off in flow or water pressure to the neighboring fixture either won’t be noticed and/or won’t create a potential scalding issue.
An example is a dishwasher tied onto the kitchen sink hot-water line and toilets tied onto bathroom sink cold-water lines. In all systems, the total PDL must be considered for the main-trunk hot/cold lines or main hot/cold feeds to the manifold(s).
Most flow-through trunk-and-branch systems I see miss the mark by just one pipe size. An optimal distribution system for the average home will utilize 1-inch trunk lines with a combination of 3/4-inch and 1/2-inch branch lines. (The 3/4-inch lines go to baths and showers; everything else gets 1/2-inch). When I’m using a home-run system, I’ll run 1-inch lines at least to the manifold’s cold-and hot-water inlets.
Typically, though, we find trunk lines are 3/4-inch with 1/2-inch branches, which leads to consumer complaints regarding temperature and pressure fluctuations. Those narrow trunk lines will save a couple of hundred bucks in the course of a job — but it’s not always the best way to plumb a house.
Pipe size, along with piping material and the velocity of water running through it, all figure into the amount of water pressure (in psi) lost along a run of piping (see Table 2 below as an example). There’s also friction loss due to fittings and valves, as well as a standard loss of 1 psi for every 2.31 feet of rise. So a static pressure of 30 psi in the basement at a well pump will drop to less than 15 psi on the third floor of a three-story McMansion due to the 35-foot rise from pump switch to showerhead. A master bathroom with dual shower valves is headed for problems unless the designer or installer properly sizes the supply lines. Charts showing pressure losses for all pipe sizes and types as well as friction losses are easily found in the code books.
ENLARGE
Table 2
Size that water heater right
I don’t typically see tank-style water heaters that are grossly oversized or undersized for the task at hand. But that hasn’t been true in the case of tankless water heaters.
Early on, many manufacturers’ flowcharts didn’t accurately represent the temperature of water coming in. The problem was, if you were getting 40° F water off the street, what came out in terms of gallon per minute at 120° was much different from what people were led to believe. To the credit of these manufacturers, their charts are now much more realistic.
The answer is not to avoid using new technologies when they’re available and fit the bill — there’s nothing sensible about that. But do your homework. Find out the incoming water temperature, and get the right information from the manufacturer regarding flow rates to ensure that what’s being installed is up to the job based both on water temperature and fixture demand.
Don’t skimp on valves
In competitive-bid situations where the low bid gets the job, it’s not unusual for homeowners to discover during a crisis that they’ve got just one shutoff valve for their entire plumbing system, where cold water enters the home. This sets up the potential for going without water throughout the house until a plumber arrives for a repair. Even home-run manifolds can be purchased without valves to shave costs.
Adding in the valves that make maintenance easier for future homeowners may cost $150 to $300 in labor and materials — enough to cost a conscientious plumber the job. Better-quality plumbing systems will incorporate additional shutoff valves in the water distribution lines, and the best systems will incorporate individual-fixture shutoff valves to isolate any type of problem until it can be repaired without affecting the remainder of the home’s plumbing system.
Support your local waste line
Drainage lines within a home normally rely on gravity to carry waste away. Standard fall tilts at 1/4-inch per foot in the direction of flow.
Support of horizontal drains means designing for a worst-case scenario — that is when the pipe becomes backed up with solids, grease and/or water. Water alone weighs 8.34 pounds per gallon; pack in solids and grease and it doesn’t take a rocket scientist to understand why plastic drains require support every 4 feet. I’ve come across more than my share of plastic hangar straps, which, while lightweight and easy to handle, can stretch, become brittle and break off, causing drain line sags that collect solids and water that build into problems.
The advent of low-consumption fixtures is causing some folks to hesitate in their use of high-efficiency toilets that use 1.28 gpf or less. The concerns center on what’s called “drain-line carry” — the distance a toilet flush will carry simulated human waste. The challenge here is that the larger diameter, 4-inch-minimum-size, below-grade pipe required by plumbing codes allows a wider, shallower and weaker flow than would a 3-inch diameter pipe. In this case, it may be time that plumbing codes were revised to reflect problems in the field related to drain-line carry and low-flow fixtures, there’s been a belly or sag in the middle of the line — which gets us back to the issue of support.
While on the subject of waste drains, note this: T-fittings should never be laid on their backs. Drainage cascading into this “lazy T” will not be directed downstream, as it would using a y-fitting, but be partially diverted upstream, setting up a perfect scenario for solids to be deposited that may not be scrubbed away by subsequent flows. The lone exception to this rule is a T laid on its back and serving as the fresh-air vent.
Design trouble-free venting
Often overlooked and misunderstood in terms of their importance, vents are what allow a plumbing system to function properly. Improperly installed or missing vents can wreak havoc, causing drains to siphon out traps and toilets to perform sluggishly.
Unlike drainage lines, vent lines can run uphill or downhill as long as no bellies are created where water will collect and restrict airflow. In vent lines, T-fittings may lie on their backs and, along with y-fittings, be installed upside down so water droplets can use gravity to drain away.
Vent piping should always be run full-sized for the main central vent; side branches can be the same or smaller in diameter. Vents should never be reduced because debris (leaves, birds, balls tossed up on the roof) has the potential to fall into the larger diameter pipe and get lodged at the point of reduction, rendering the vent useless.
Notice that the supply pipe size decreases as the circuit moves away from the heat source while the return pipe size increases. Pipe size changes are made to keep flow velocity or head loss along the main approximately equal. For pipe sizes of 2 inches and smaller, flow velocity should generally not exceed 4 feet per second. For larger pipes, sizes should be selected to maintain the head loss along the pipe in the range of 4 feet of head loss per 100 feet of pipe.
In systems with relatively short supply and return mains, the designer may elect to use the same pipe size for all mains. This decreases system head loss, which may, in turn, reduce circulator size. However, it also increases piping cost.
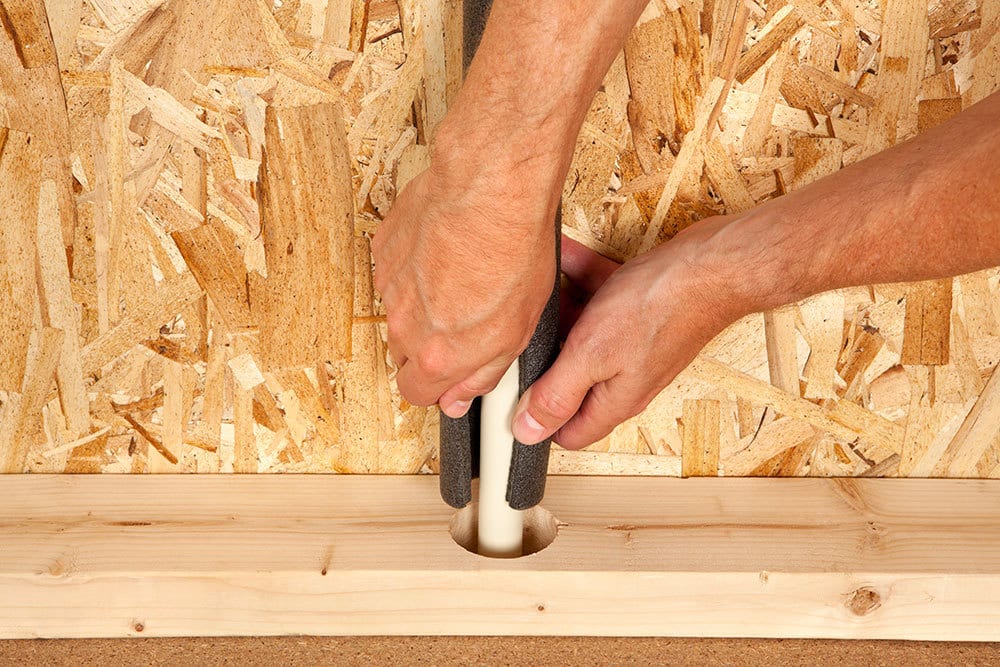
Insulate lines when walls are open
While it’s more common to find hot-water lines insulated, insulating a home’s cold water lines makes perfect sense if you want to avoid condensation dripping off the lines and promoting mold growth. Any line that’s readily accessible and not in an insulated wall should be insulated with one of the many types of pipe insulation on the market. The higher the insulation’s R-value, the more resistant to heat loss or gain, and the better the transfer of stable water temperatures.
Leave no penetration unsealed
The average home leaks air like a sieve — allowing heated air to exit in winter and hot, humid air to enter during summer — wasting as much as 40% of a household’s annual energy budget. Common sense plumbing designs minimize the number and size of holes, cuts and voids created during the installation phase.
Long gone should be the days when over-size holes were drilled through a home’s timber skeleton for plumbing. While penetrations need to be large enough to accommodate expansion and contraction without generating noise, all penetrations where exfiltration and infiltration will occur — specifically, those between conditioned and nonconditioned spaces — need to be sealed shut. Simply stuffing fiberglass insulation into those voids may look satisfying, but fiberglass doesn’t block airflow. Expanding closed-cell foam or fire caulking will prevent the energy loss affecting most homes and is best applied during construction when roughed-in systems are still accessible. Vent systems should be designed with as few roof penetrations as possible.
Maximize scald protection
If you’ve built a new home over the past decade, chances are that plumbing codes (in areas where codes have been adopted and are enforced) required the bathing module faucets to be classified as “scald guard.” There are three types: P-only, which react to pressure changes; T-only, which react to temperature fluctuations; and combination P/T valves. What you most likely ended up with, due to costs, are pressure-balance faucets that work well — as long as the hot- and cold-water temperatures are always the same. In the real world, hot- and cold-water delivery temperatures are constantly changing. Pressure-balance scald-guard faucets are blind to temperature changes. One adjusted to deliver a maximum of 120° F during the winter when cold water enters the home at 40° will deliver much hotter water when cold water enters the home at 80°. T-only scald-guard faucets are an improvement in safety and cost a little bit more, but the P/T combination scald-guard valves offer premium protection with pricing that’s no longer cost-prohibitive.
At the same time, every tank-style water heater should be equipped with an ASSE-listed (American Society of Safety Engineers) thermostatic scald guard device. Why? Codes governing these water heaters allow the storage temperature to exceed the thermostat’s setting by up to 30° F. A water heater set for 120° can, therefore, deliver 150° water and still meet code. Each year in the United States, more than 100,000 people seek medical treatment for hot-water scald burns, with more than a quarter of them being children and the elderly, whose skin is thinner and more susceptible to scald burns.
DonNichols / Imgorthand / iStock / Getty Images Plus via Getty Images. Image courtesy of Caleffi North America. Figures courtesy of Dave Yates.
This article was originally published in Plumbing & Mechanical in November 2016.