The finer points of applying a 2-pipe buffer tank
Buffer tanks can be piped in several different ways.
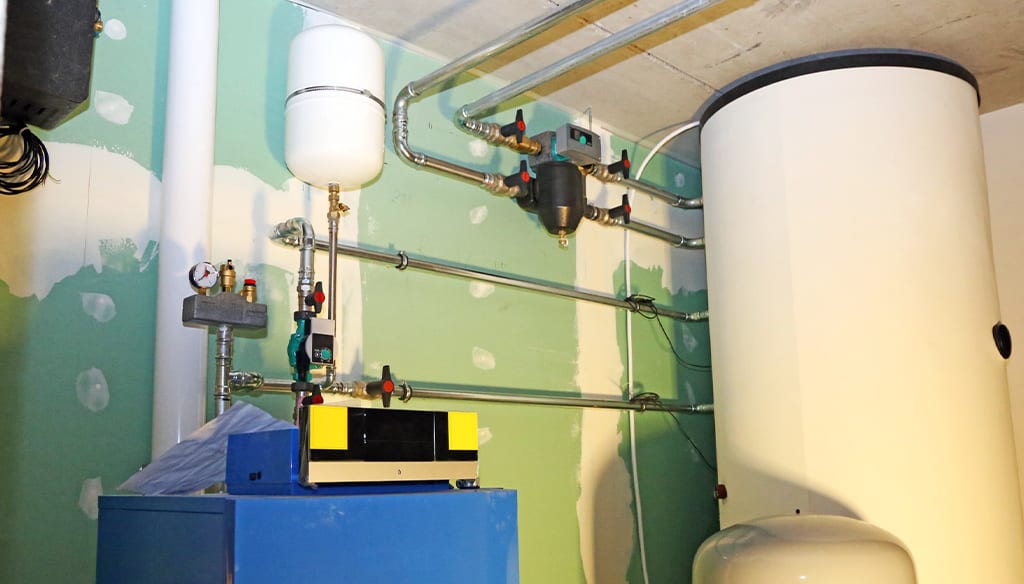
Buffer tanks provide additional thermal mass between a hydronic heat source and a zoned distribution system. They allow the rate of heat production by the heat source to be very different than the rate of heat dissipation by the heat emitters. When the heat source is operating, the buffer tank absorbs the difference between the rate of heat production and the rate of heat dissipation to the load. This allows the heat source to remain on for several minutes and, thus, not “short cycle.”
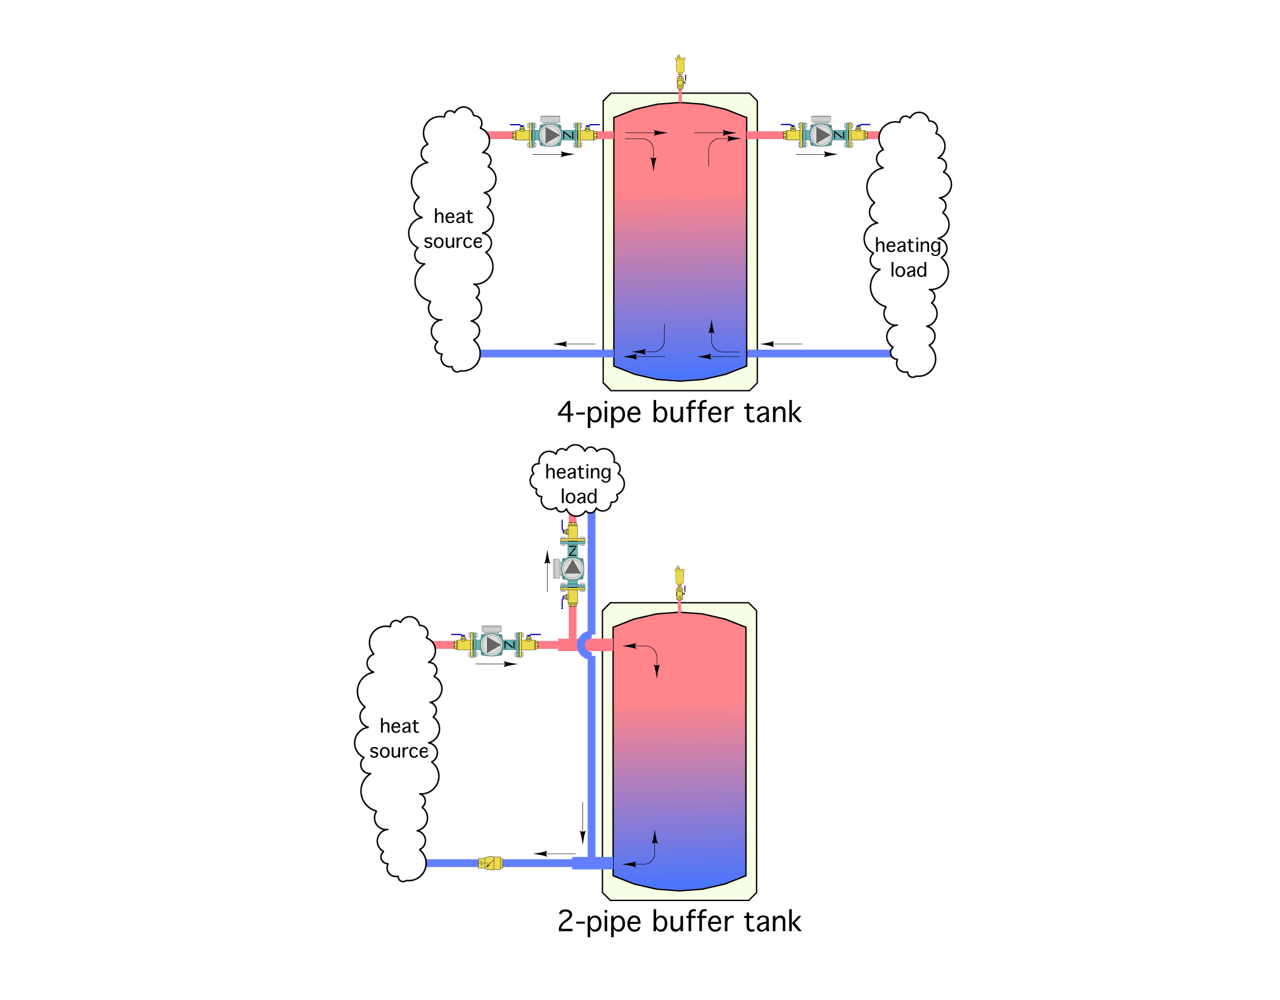
Buffer tanks can be piped in several ways. The two most common are 4-pipe and 2-pipe configurations, as shown here in Figure 1.
ENLARGE
FIGURE 1
Of these, the 4-pipe configuration has been the traditional approach in North America. And while it has been successfully applied in many systems, there are, in my opinion, advantages to the 2-pipe configuration. To appreciate these advantages it’s important to first understand the importance of temperature stratification within the buffer tank.
Hot top, cool bottom
Temperature stratification describes the natural tendency for the hottest water in the tank to reside near the top of the tank while the coolest water resides near the bottom of the tank. This happens because hot water is less dense than cool water. Left undisturbed, most buffer tanks will develop temperature stratification.
A well-stratified buffer tank preserves the thermodynamic “quality” or “usefulness” of the stored heat. It makes the highest-temperature water within the tank available to the load, rather than only offering the average or mixed water temperature to the load.
Therefore, buffer tanks should be applied in ways that preserve temperature stratification. Doing so means protecting the tank against internal flow velocities and flow orientations that would disrupt temperature stratification. Vertically oriented flows within the tank are especially undesirable because they cause internal mixing within the tank.
There are several ways to minimize vertical flow velocity in buffer tanks. One is to ensure that all piping carrying water into the tank enters horizontally. If the piping must enter the tank vertically, there should be detailing inside the tank to orient the flow horizontally near the top and bottom of the tank. It’s also important to limit the entering flow velocity. In theory, the slower the entering flow velocity, the better. In practice, I suggest not allowing entering flow velocity to exceed 2 feet per second.
The advantage of 2-pipe tanks
A 2-pipe buffer tank places the piping leading to and from the heating load between the heat source and the buffer tank. If the load is operating at the same time as the heat source, which is common, the flow rate passing into the buffer tank is the difference between the heat source flow rate, and the load flow rate. For example, if the flow rate from the heat source is 10 gpm and the load flow rate is 7 gpm, the flow rate entering the upper sidewall connection of the tank is 10 — 7 = 3 gpm. The reduced entering flow velocity, in comparison with what the entering flow rate would be in a 4-pipe tank (e.g., 10 gpm), reduces mixing within the tank. Less mixing means better temperature stratification.
The 2-pipe configuration also allows heated water from the heat source to flow directly to the load without having to interact with the thermal mass of the tank. This can speed heat delivery to the load during critical times such as recovering from a temperature setback or following a “cold start” of the system.
Small things matter
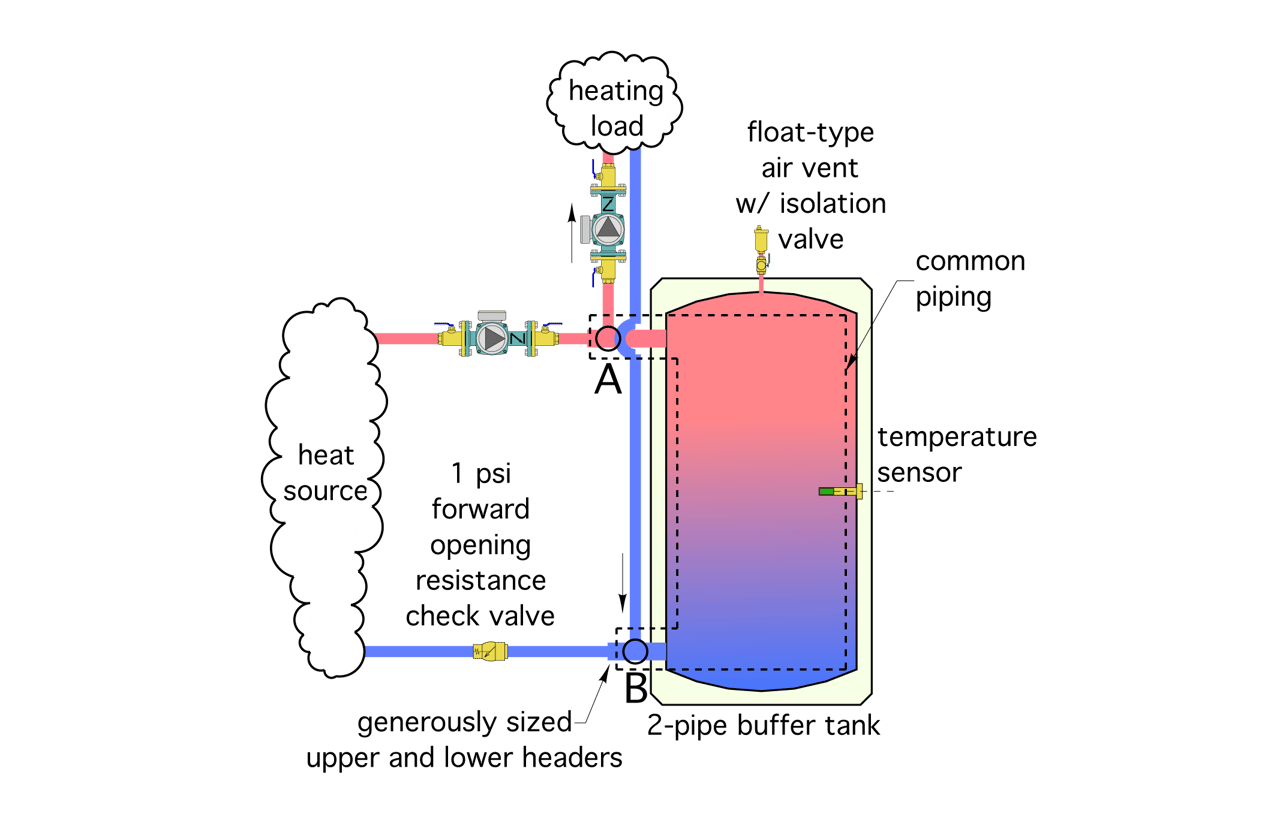
There are several details that allow a 2-pipe buffer tank to perform optimally. They are shown in Figure 2 and described below.
ENLARGE
FIGURE 2
No. 1: The tees connecting the load piping to the system (e.g., points A and B in Figure 2) should be located as close to the tank as possible. This minimizes the head loss of the flow path through the “common piping” shared by the heat source circuit and the load circuit. This allows the thermal storage tank to do double duty as a hydraulic separator between the heat source circulator and the load circulator, preventing them from interfering with each other.
No. 2: A spring-loaded check valve or other device that can provide a forward opening resistance of 0.5 to 1 psi, as well as block reverse flow, should be located in the heat source circuit. The forward opening resistance of this device prevents flow returning from the load circuit from inadvertently passing through the heat source when it’s off, and the load is being supplied from the buffer tank. Preventing this flow stops heat from being dissipated through the heat source circuit. It also prevents some of the cooler flow returning from the load from bypassing the buffer tank and “diluting” the heat transfer that’s possible when all flow returning from the load passes through the buffer tank while the heat source remains off. A spring-loaded check or other device with 0.5 to 1 psi forward opening resistance will immediately pop open when the heat source circulator turns on. An alternative to the check valve is a zone valve or motorized ball valve that closes whenever the heat source is not operating.
No. 3: The sidewall piping connections to the tank should be generously sized. A suggested criterion is to keep the flow velocity entering the tank at or below 2 feet per second. This usually requires the short headers connected to the sidewall of the tank to be larger than the piping coming from either the heat source or the load circuits. Look for buffer tanks with generously sized sidewall connections.
No. 4: Install a float-type air vent at the top of the buffer tank to allow internal air to escape as the tank is filled above the upper sidewall connections. I also suggest a ball valve or other means of isolation between the air vent and tank. This allows the vent to be serviced or replaced without isolating large portions of the system.
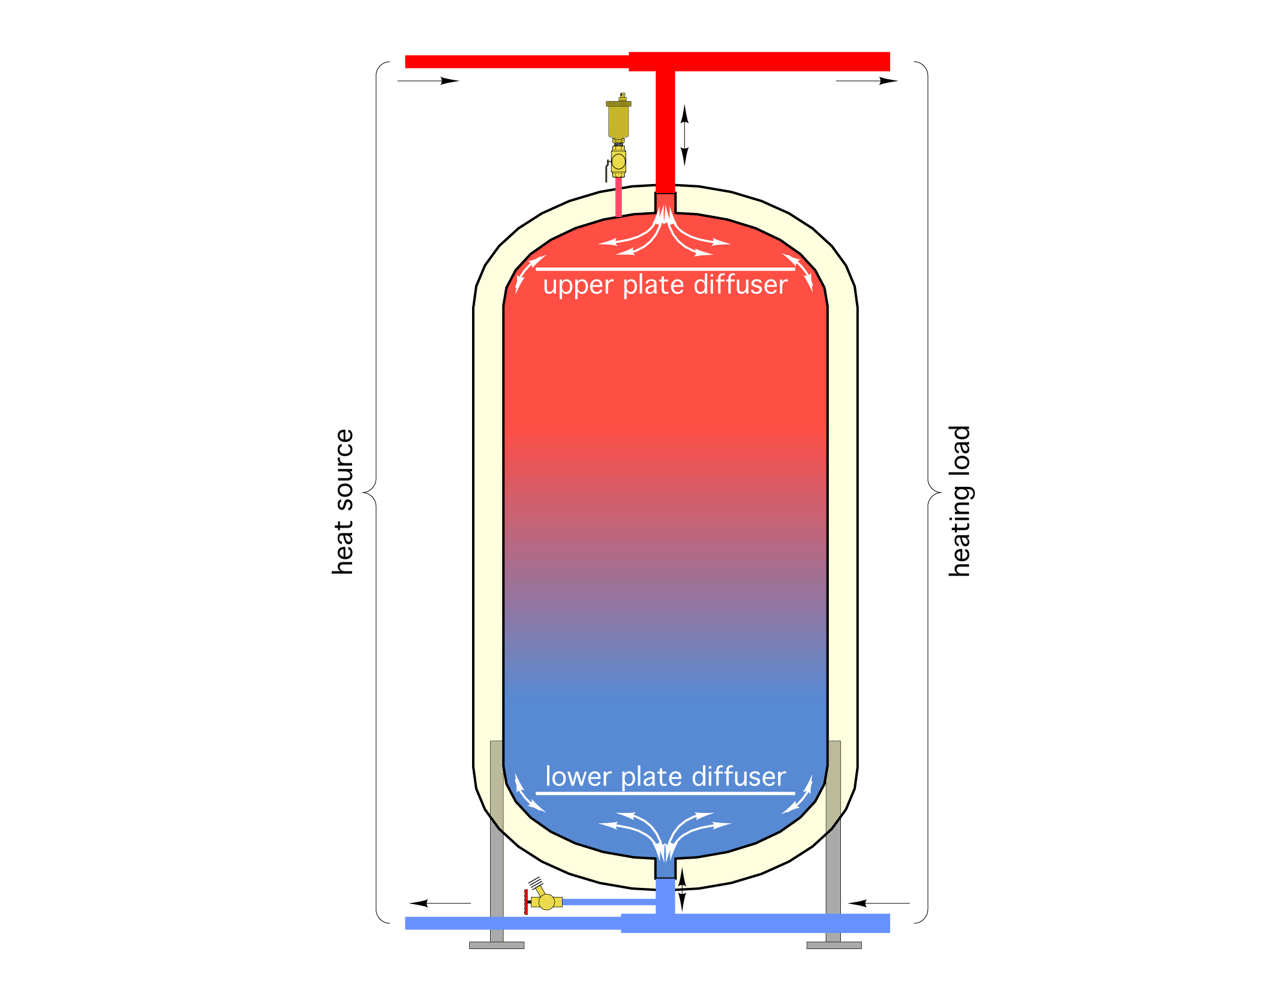
No. 5: The upper and lower sidewall connections should be as close as practical to the top and bottom of the tank shell. This ensures that all the water volume inside the tank “participates” in the energy exchange process. This is especially important in well-stratified tanks where the hottest water can remain above the active flow zone of the upper tank connection. I suggest that the centerline of the sidewall connections be no more than 6 inches below or above the top and bottom of the tank.
If the tank has elliptical top and bottom bells, consider using top and bottom connections in combination with internal baffle plates as shown in Figure 3. The annular space between the inside of the tank shell and circular diffuser plate should be large enough to greatly reduce the flow velocity entering or leaving the main portion of the tank. I suggest a minimum “gap” of 2 inches between the outside of the circular diffuser plate and the inside of the tank shell.
ENLARGE
FIGURE 3
No. 6: When the heat source is a mod/con boiler or heat pump, it is generally turned on and off based on the temperature at a sensor located at the mid-height of the tank. That sensor should be mounted into an immersion well. The sensor should fit snuggly inside the well, and be fully coated with thermal grease prior to being inserted. It should be pushed all the way into the well tube and secured in a way that prevents it from being accidentally pulled toward the open end of the well.
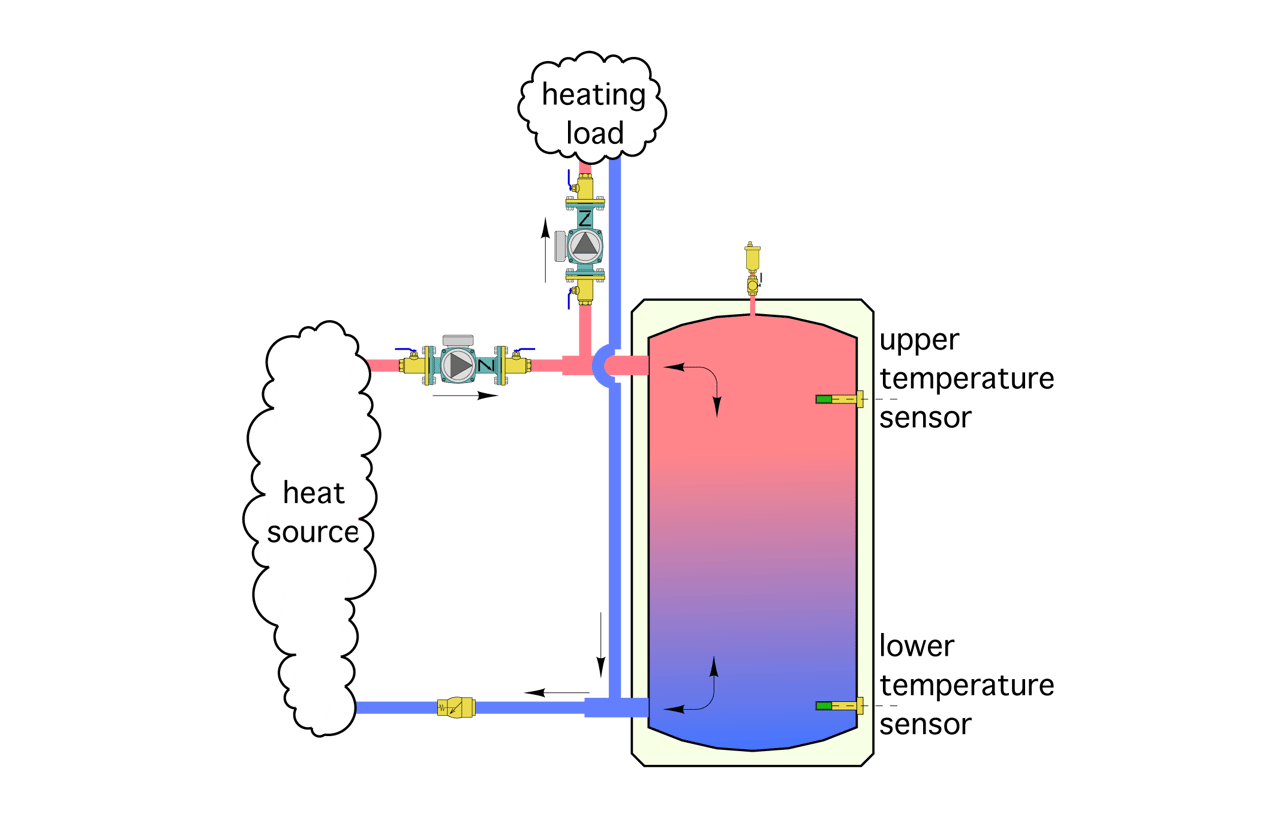
When the heat source is a pellet-fired boiler, consider turning that boiler on and off based on two temperature sensors within the tank. The boiler is turned on when the upper-temperature sensor drops to some set point. It remains on until the lower temperature sensor reaches a higher set point. This helps keep the pellet boiler operating for long cycles during which it attains high efficiency and produces minimal emissions.
No. 7: Finally, buffer tanks need to be well-insulated. Tanks used for relatively low-temperature heat storage, such as in systems using heat pumps, should have a minimum insulation R-value of 12° F • ft2 • hr/Btu. That’s roughly equivalent to 2 inches of sprayed polyurethane insulation. Tanks used in systems with higher-temperature heat storage should have even high insulation R-values. I suggest R-24° F • ft2 • hr/Btu as a target insulation requirement for tanks that could operate at storage water temperatures in the range of 180° F.
ENLARGE
FIGURE 4
Do it right
Buffer tanks play an important role in any hydronic heating and cooling system where the capacity of the heat source, or chiller, is well above the smallest independently operated load circuit. Pay attention to the details to obtain optimal performance.
U. J. Alexander, iStock / Getty Images Plus via Getty Images. Figures courtesy of John Siegenthaler.
This article was originally published in Plumbing & Mechanical in April 2017.