bulletin | feature
‘There is always another way to destroy refractories!’
Root cause analysis of a steel ladle argon system breakout
By Tom Vert
Determining the root cause of a refractory failure issue is essential for liability and safeguarding reasons. A proper root cause analysis must consider all potential sources of failure, from materials to installation to operational factors.
This article will show how root cause analysis can be used to investigate and resolve refractory failure issues, using the example of a steel ladle argon system breakout.
Breakouts are when molten metal leaks and/or pours out from the refractory-lined ladle during steel production. When breakouts occur, all personnel in a steel shop have a stake in knowing what caused the breakout to avoid future occurrences. For example, people working in operations, installation, and refractory supply will want to ensure that their practices, handiwork, and products, respectively, did not cause the breakout, and if they did, what changes need to be made to error-proof the system.
Determining the cause(s) of a breakout can help personnel and companies avoid liability. With so many stakeholders, diplomatic skills are a must for someone conducting a breakout investigation. But even if everyone performed their job perfectly, breakouts will inevitably occur at some point during production due to the wide range of possible failure modes. So, identifying the root cause(s) behind a breakout will allow personnel to put measures in place to avoid future failures.
This article describes the fundamentals to conducting a proper root cause analysis. Such an analysis will give all personnel confidence in the results and drive the prevention phase of the investigation.
Background: The mechanics of a steel ladle argon system breakout
When molten steel is placed in a refractory-lined ladle to undergo refinement before casting, stirring the molten mixture is necessary to ensure optimal control of temperature and chemistry during critical grade manufacturing. But depending on the stir system used, there is a risk that the molten mixture will breakout from the ladle.

ADVERTISEMENT
There are two main stir systems commercially available: indirect stirring (through electromagnetic forces) and direct stirring (through refractory argon plugs). While the former option does not come with the risk of molten steel breakout, the latter option is more common because it allows for much more vigorous and controllable stirring, as well as avoiding the major capital cost of installing an electromagnetic system.
In a direct stirring system (Figure 1), argon is injected through a piping system into the bottom of the steel ladle. The argon plugs are made of a permeable refractory that allows the gas to flow at the rate necessary for good stirring. Over time, the plugs will wear down and must be replaced with new ones, typically after 10–20 uses. Sometimes, the wear is accelerated and/or the plugs are not replaced at the right moment. In that case, the 20–350 tons of molten steel may break out from the ladle and escape, resulting in damages to major equipment (Figure 2).
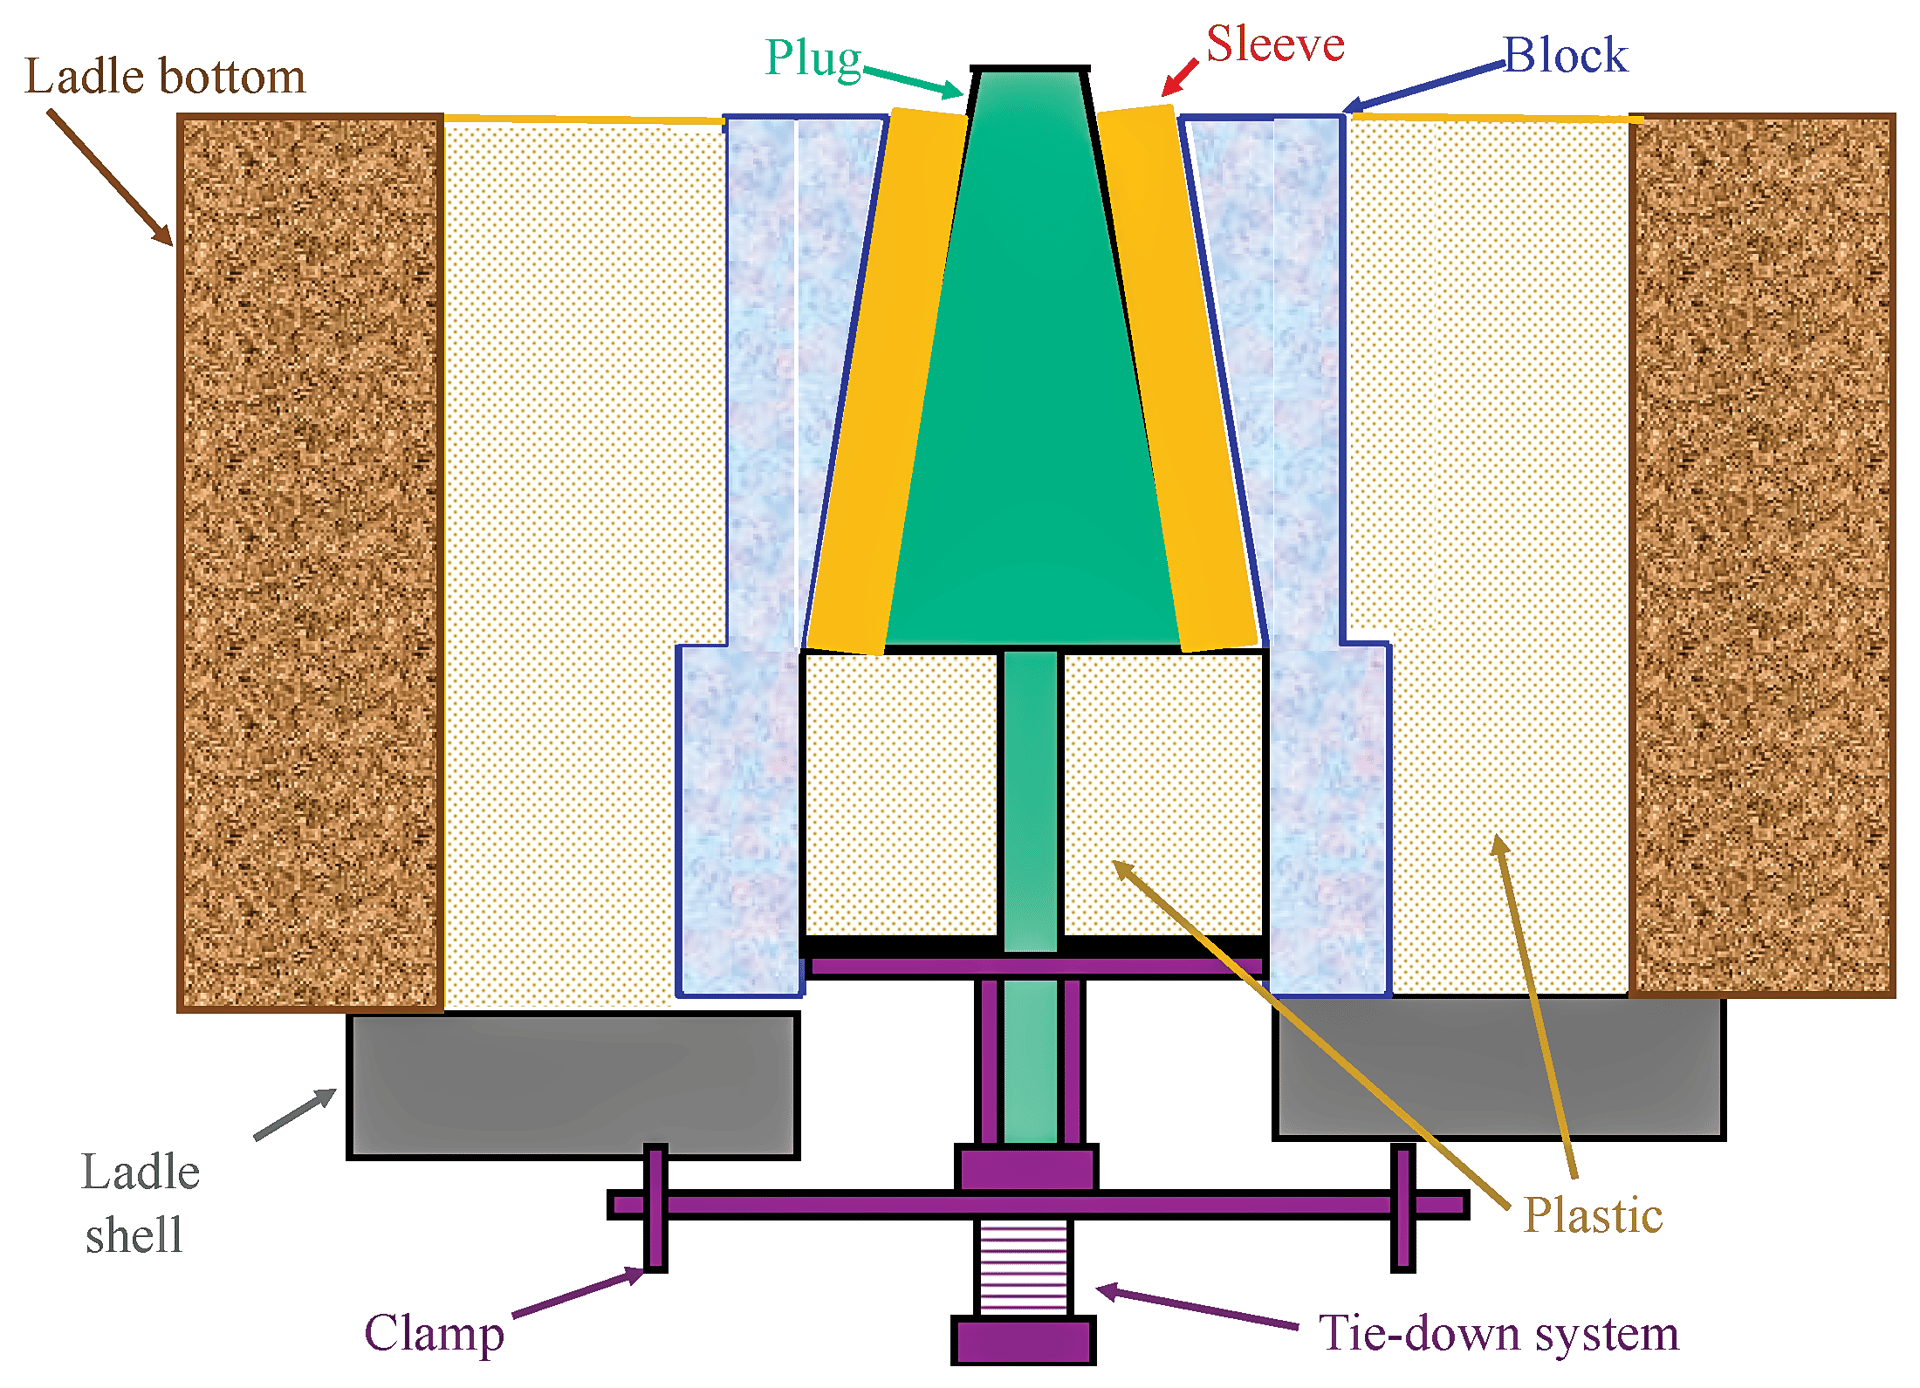
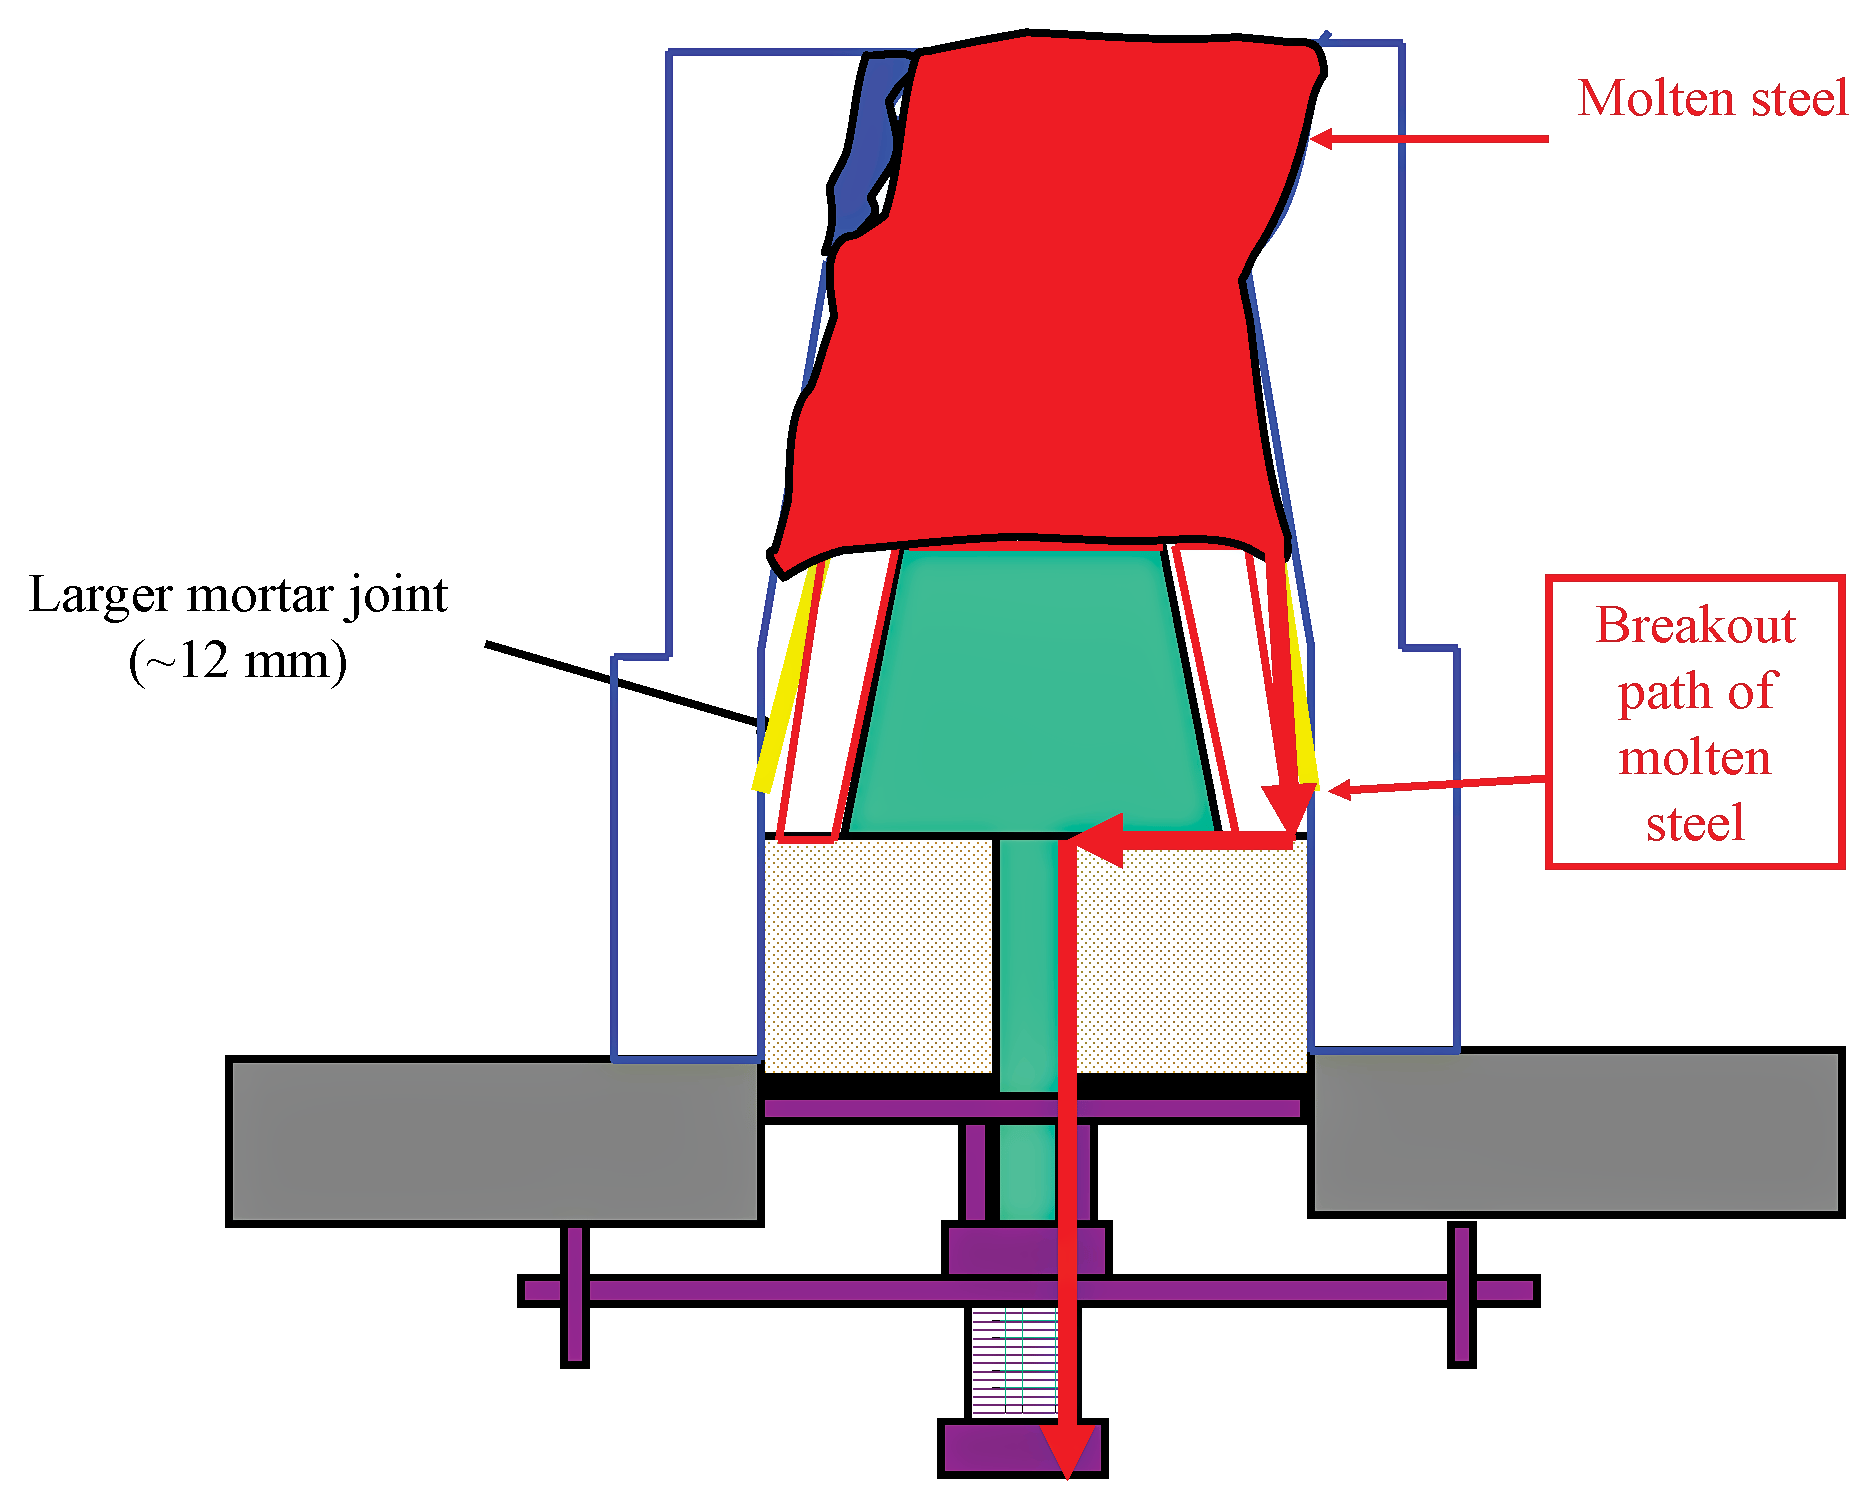
FIGURE 1.
FIGURE 2.
Figure 1. Typical argon stirring system layout.
Figure 2. An illustration showing one pathway that molten steel can take during a breakout event.
Credit: Tom Vert
To determine the root cause(s) of a molten steel breakout, the first step is to ensure all refractories are preserved before demolition so that a thorough analysis can be conducted. Ruling out potential failure modes can be just as useful as identifying the right one because direct observation of certain breakout pathways is not always available. For example, molten steel can flow out of the ladle with such force that the argon plug itself and/or the sleeve is washed out, so they are not available for review.
Figure 3 shows the seven main failure modes through which molten steel escapes the ladle during a breakout event. Failure modes 1, 2, and 3 usually can be determined by the physical evidence of deteriorated refractories and/or steel skulls left over from the breakout. In contrast, failure modes 4, 5, 6, and 7 can be harder to find, and so require a review of the following key evidence:
- Last laser and/or visual analysis of the hot face of the ladle argon plug at the lay down stand.
- Information on oxygen lancing history (e.g., frequency, pressures, times).
- Stirring history of the plugs (e.g., # of heats, length of stirring, long stirring, flow rates, pressures).
- Installation history of the plugs (e.g., who changed them, installation practices, proximity to the failure).
There are 57 factors that are recognized as potential root causes for breakout failures, classified generally as material failures, installation practices, and operating/processing practices, and usually, some combination of these. An investigator must be open minded and review every potential failure to determine what is the root cause and then find a way to eliminate it.
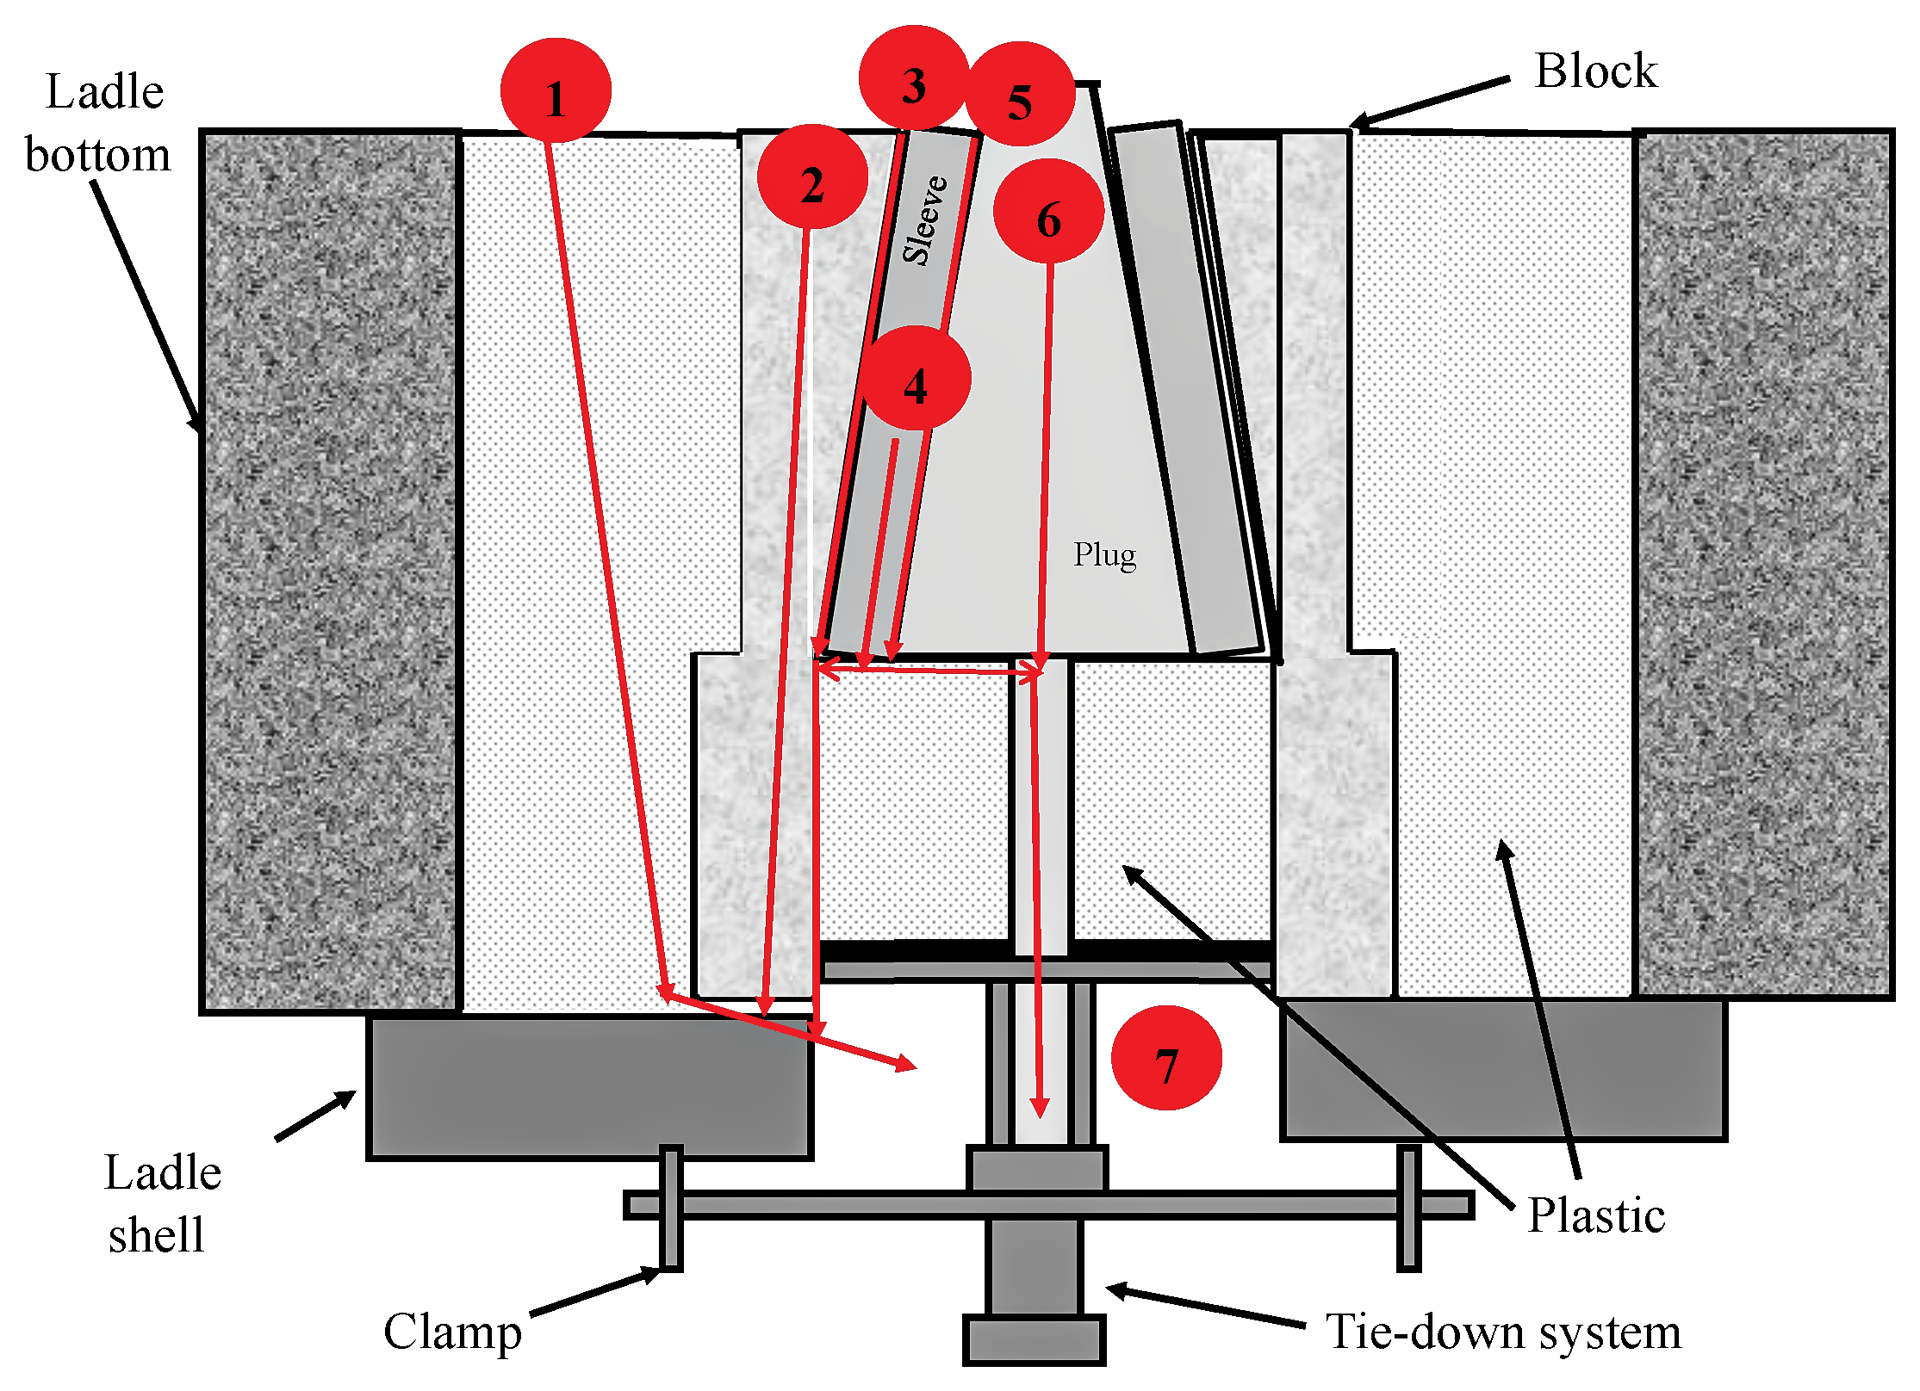
FIGURE 3.
Figure 3. Seven main failure modes through which molten steel escapes in a direct stirring system:
1) plastic refractory joint,
2) refractory surround block,
3) joint between block and sleeve,
4) sleeve itself (and supporting plastic),
5) joint between the sleeve and plug,
6) argon plug itself (and supporting plastic), and
7) argon plug itself and piping system.
Credit: Tom Vert
The seven failure modes of molten steel breakout
During root cause analysis, an investigator will consider each of the following failure modes and determine which mode, or more accurately, which combination of modes led to the breakout of molten steel.
Mode 1: Failure of block support
FAILURE CAUSE: The supporting refractory material around the block either wears too quickly, cracks, and/or spalls, creating an easy pathway through which molten steel can flow. The steel may take a few heat cycles to break through due to freezing near the ladle shell, but if true integrity is lost, then it will make its way down, creep under and/or lift the block, and break out.
Potential refractory cause(s)
a. Failure of the refractory material due to poor quality from the supplier.
b. Failure of refractory material due to over aged and/or improper storage (e.g., stored in high humidity area).
c. Low quality material chosen for an application with higher slag and/or temperature resistance.
Potential installation cause(s)
d. Ram or plastic not installed dense enough and/or with air pockets due to poor ramming equipment and/or technique.
e. Castable not installed and/or dried out properly with too much water and/or poor material or ambient temperature control, leading to poor density and/or minimal bonding strength.
Potential process cause(s)
f. Surrounding material damaged due to improper dig out on block and/or plug changes.
g. Extremely aggressive slags eating into the surrounding material and causing extreme unexpected wear.
h. Extreme oxygen lancing in the wrong spot eating into the surrounding material and causing extreme unexpected wear.
Mode 2: Failure of refractory block (assuming a precast block is used)
FAILURE CAUSE: The main refractory block either wears too quickly, cracks, and/or spalls, creating an easy pathway through which molten steel can flow. The steel may take a few heat cycles to break through due to freezing near the ladle shell, but if true integrity is lost, then it will make its way down and break out.
Potential refractory cause(s)
a. Failure of refractory material due to poor quality from supplier.
b. Failure of refractory material due to over aged and/or improper storage (e.g., getting soaked in water in storage).
c. Low quality material chosen for an application with higher slag and/or temperature resistance.
d. Improper refractory shape (i.e., square blocks always crack in service).
Potential installation cause(s)
e. Block is not installed level and secure leading to stress and then cracks.
f. Supporting refractory is not installed and/or dried out properly with too much water and/or poor material or ambient temperature control, leading to poor density and/or minimal bonding strength and then a moving and/or cracking block (see Mode 1 for more info).
Potential process cause(s)
g. Block is damaged due to improper dig out on block and/ or plug changes.
h. Extremely aggressive slags eating into the block and causing extreme unexpected wear.
i. Extreme oxygen lancing in the wrong spot eating into the block material and causing extreme unexpected wear.
Mode 3: Failure of joint between block and sleeve
FAILURE CAUSE: The joint between the main refractory block and the sleeve joint becomes compromised, creating an easy pathway through which molten steel can flow. The steel may take as little as one heat cycle to break through, at which point it will make its way down through the natural path and break out.
Potential refractory cause(s)
a. Failure of refractory material due to poor quality from supplier.
b. Failure of refractory material mortar due to improper mixing and/or over aged and/or improper storage (e.g., getting frozen).
c. Low quality material chosen for an application with higher slag and/or mechanical strength requirement.
Potential installation cause(s)
d. Sleeve is not installed properly due to bad mortaring (too much mortar and too thick a joint), leading to a loose installation and potential cracking and/or joint and/or sleeve movement.
e. Sleeve is not installed properly due to bad mortaring (too little mortar and too thin a joint), leading to a tight installation and potential cracking/stress and/or joint.
Potential process cause(s)
f. Block is damaged and/or worn low (high wear and/or run too long), leading to direct access to the lower joint area.
g. Improper cleanout of slag/steel at hot face of plug/sleeve/block, leading to sleeve not sitting in correct location and open and/or offset joint (note that this condition can lead to Mode 3d failure, large joint).
Mode 4: Failure of refractory sleeve (assuming precast sleeve is used)
FAILURE CAUSE: The main refractory sleeve either wears too quickly, cracks, and/or spalls, creating an easy pathway through which molten steel can flow. The steel may take a few heat cycles to break through due to freezing near the ladle shell, but if true integrity is lost, then it will make its way down and break out.
Potential refractory cause(s)
a. Failure of refractory material due to poor quality from supplier.
b. Failure of refractory material due to over aged and/or improper storage (e.g., getting soaked in water in storage).
c. Low quality material chosen for an application with higher slag and/or temperature resistance.
d. Improper refractory shape (i.e., too thin a sleeve [< 30 mm] can lead to cracks in service).
Potential installation cause(s)
e. Sleeve is not installed level and secure, leading to stress and then cracks.
f. Supporting refractory is not installed and/or dried out properly with too much water and/or poor material or ambient temperature control, leading to a moving and/or cracking sleeve (see Mode 3 for more info).
Potential process cause(s)
g. Sleeve is damaged due to improper dig out on plug changes.
h. Extremely aggressive slags eating into the sleeve causing extreme unexpected wear.
i. Extreme oxygen lancing in the wrong spot eating into the sleeve material and causing extreme unexpected wear.
Mode 5: Failure of joint between sleeve and plug (for systems with a sleeve)
FAILURE CAUSE: The joint between the main refractory sleeve and the plug joint becomes compromised, creating an easy pathway through which molten steel can flow. The steel may take as little as one heat cycle to break through, at which point it will make its way down through the natural path and break out.
Potential refractory cause(s)
a. Failure of refractory material due to poor quality from supplier.
b. Failure of refractory material mortar due to improper mixing and/or over aged and/or improper storage (e.g., getting frozen).
c. Low quality material chosen for an application with higher slag and/or mechanical strength requirement.
Potential installation cause(s)
d. Plug is not installed properly due to bad mortaring (too much mortar and too thick a joint), leading to a loose installation and potential cracking and/or joint and/or plug movement.
e. Plug is not installed properly due to bad mortaring (too little mortar and too thin a joint), leading to a tight installation and potential cracking/stress and/or joint opening.
Potential process cause(s)
f. Sleeve is damaged and/or worn low (high wear and/or used too long), leading to direct access to the lower joint area.
g. Improper cleanout of slag/steel at hot face of plug/sleeve, leading to plug not sitting in correct location and open and/of offset joint (note that this condition can lead to Mode 5d failure, large joint).
Mode 6: Failure of refractory plug
FAILURE CAUSE: The main refractory plug either wears too quickly, cracks, and/or spalls, creating an easy pathway through which liquid steel can flow. The steel may take a few heat cycles to break through due to freezing near the ladle shell, but if true integrity is lost, then it will make its way down and break out.
Potential refractory cause(s)
a. Failure of refractory material due to poor quality from supplier.
b. Failure of refractory material due to over aged and/or improper storage (e.g., getting magnesia plug soaked in water).
c. Low quality material chosen for an application with higher slag and/or temperature resistance (e.g., low alumina plug for low price).
d. Improper refractory type (i.e., porous vs slit vs combination plug).
e. No argon plug wear indicator (either shape and/or radiant color), making it hard to read.
Potential installation cause(s)
f. Argon plug is not installed level and secure, leading to stress and then cracks.
g. Supporting refractory joint is not installed properly, leading to a moving and/or cracking plug (see Mode 5 for more info).
Potential process cause(s)
h. Plug is damaged due to improper dig out on the plug change, in either plug or sleeve area.
i. Extremely aggressive slags eating into the plug and causing extreme unexpected wear.
j. Extreme oxygen lancing in the wrong spot eating into the plug material and causing extreme unexpected wear.
k. Thick slag and/or steel layer covering plug, making it hard to read.
l. Oxygen contaminates the argon system and burns the plug out from back side internally.
Mode 7: Failure of argon plug support system
FAILURE CAUSE: The mechanical support system located behind the plug (including the refractory plastic) becomes loose, leading to plug and/or sleeve movement, including joint openings, that creates an easy pathway through which molten steel can flow. The steel may take a few heat cycles to break through due to freezing near the ladle shell, but if true integrity is lost, then it will make its way down and break out.
Potential refractory cause(s)
a. Failure of refractory material due to poor quality from supplier.
b. Failure of refractory material due to over aged and/or improper storage (e.g., getting soaked in water).
Potential installation cause(s)
c. Supporting refractory is not installed and compacted enough, leading to loss of density and looseness in the system.
d. Supporting mechanical system is not installed and/or secured properly leading to movement of supporting plastic and/or plug/sleeve moving and/or cracking with path for steel to follow. (Note that head pressure of entire heat can quickly pressurize any looseness and the heat will be lost).
Potential process cause(s)
e. Mechanical system or argon hoses are ripped off /damaged/bent, leading to loss of supporting mechanical system.
Conclusions
Root cause analysis of a steel ladle argon system breakout is an exhaustive process that incorporates a detailed review of all relevant material, installation, and/or processing anomalies that result in loss of the molten steel. An open mind, a detailed process, and a determination not to be swayed by theory but only by facts are all required if the root cause is to be found. Only in this way can a proper engineering solution be tailored to mitigate the possibility of future breakout events.
About the author:
Tom Vert is an independent consultant through his company Strategic Refractory Consulting (Hamilton, Canada). Contact Vert.